前月の締め作業のために開いた小口現金管理のファイル・・・。
「あれ、数百円の差異がある…」
単純な入力ミスの場合もあれば、担当者に原因を聞いてみても、「前のことだから覚えていない…」ということも・・・。
何とも言えない気持ちを抱えたまま、結局は原因不明の雑損失で処理するしかない…。
そんな経験はありませんか?
もし、差異が発生したその日のうちにあるいは次の日に、あなたの元へ自動で通知が届いていたら・・・
記憶が新しいうちに原因をすぐに確認でき、面倒な調査や「原因不明金」とはおさらばできるのではないでしょうか?
毎日のお仕事、お疲れ様です!
クロウルを運営している藤井貴司です。
この記事では、前回の記事【GAS不要/ステップ形式で解説】計算ミスと集計作業をなくすGoogleスプレッドシート小口現金管理システムの作り方で作った小口現金管理シートを使います。
前回の記事って?という方はこちらからどうぞ!

この小口現金管理シートを使い、Google Apps Script(GAS)で現金有高と帳簿残高の差異を自動メールで通知するシステムをの作り方を、誰でもできるようにイチから丁寧に解説します!
今回の記事を読む上で、プログラミングの知識は一切不要です。
この記事のコードをコピー&ペーストするだけで、あなたの小口現金管理をより正確で、スピーディーなものに変えることができます。
もし、違う用途で使いたいと言った場合でも、AI(GeminiやChatGPTなど)にコードと変更したいことを伝えれば、あなたに合ったコードを作ってくれますよ。
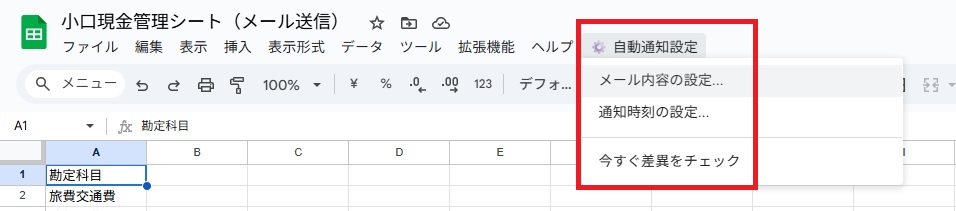
完成イメージ:こんな感じです
スプレッドシートに専用のメニューが追加され、そこから通知のタイミングやメールの文面を設定できる、非常に使いやすいツールが完成します。
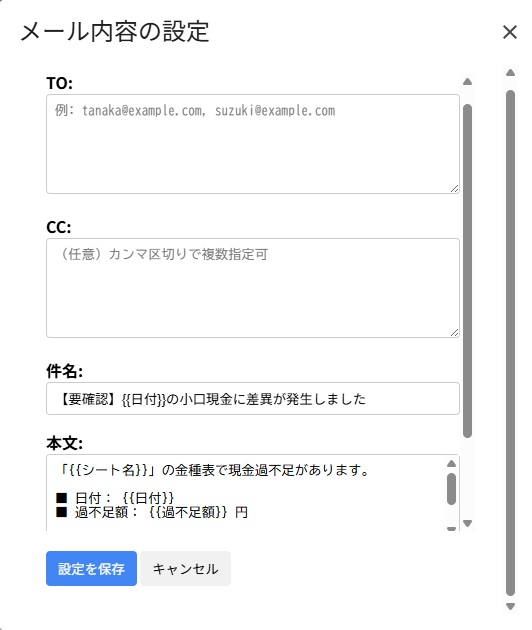
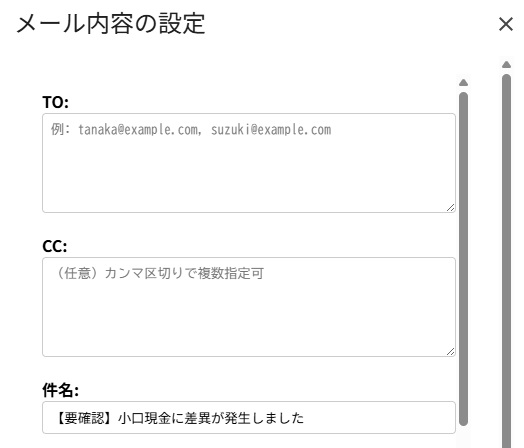
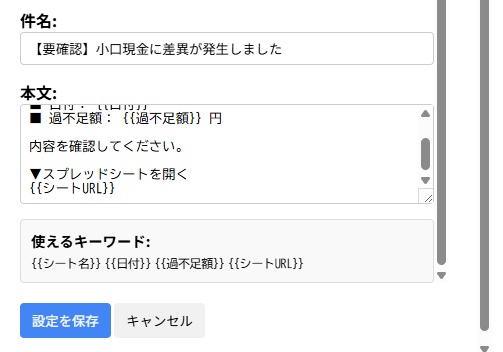
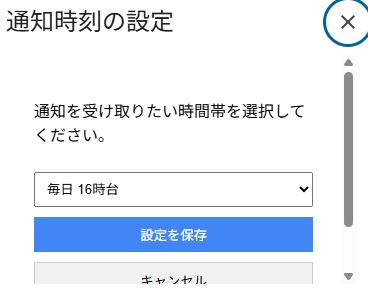
メールの宛先や件名、本文も、以下のような専用のフォームから簡単に設定できるようになります。
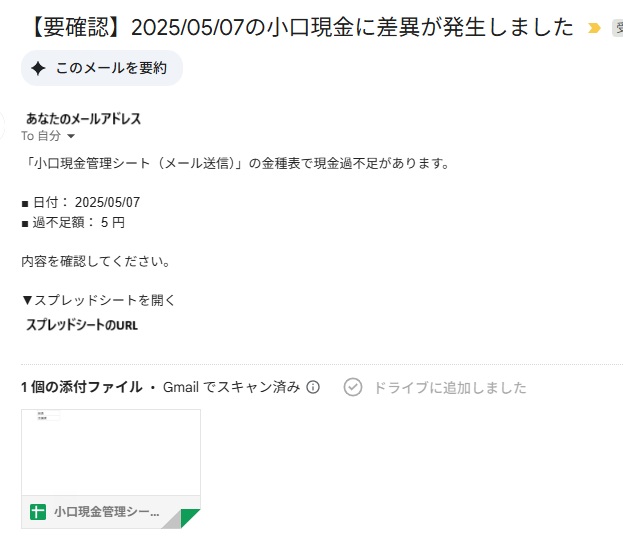
そして、差異があった日には、設定した時刻に以下のような通知メールが自動で届きます。
それでは一緒に作っていきましょう!!
STEP1:スクリプトエディタを開く
まずは、GASのコードを書き込むための場所を開きます。
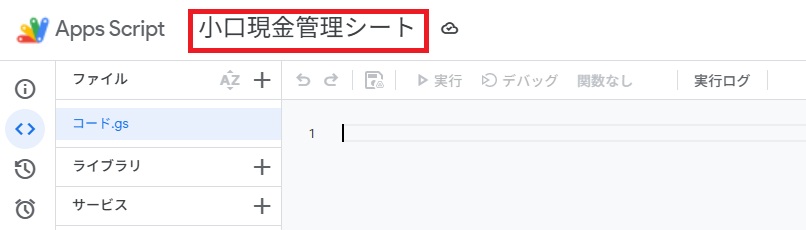
1.小口現金管理シートを開きます。
2.上部メニューの「拡張機能」から「Apps Script」を選択します。

3.新しいタブで、スクリプトエディタという画面が開けば準備完了です。
ちなみに最初は開くまでに時間がかかることがるので、開くまで待っていてください。
4.スクリプトエディタが開いたら、「無題のプロジェクト」を「小口現金管理シート」に変更してください。
STEP2:設定画面の「見た目」を作る (HTMLファイル2つ)
次に、ユーザーが設定を行うためのダイアログ画面の設計図となるHTMLファイルを2つ作成します。
① 通知時刻設定ダイアログの作成
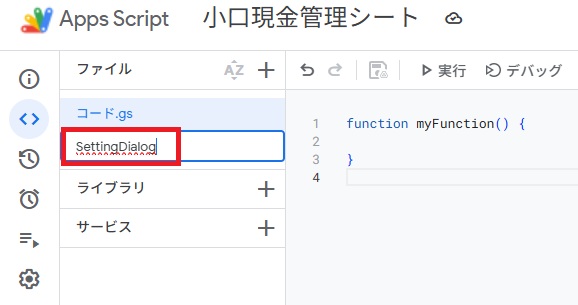
1.STEP1で開いたエディタ左側の「ファイル」の横にある「+」アイコンをクリックし、「HTML」を選択します。
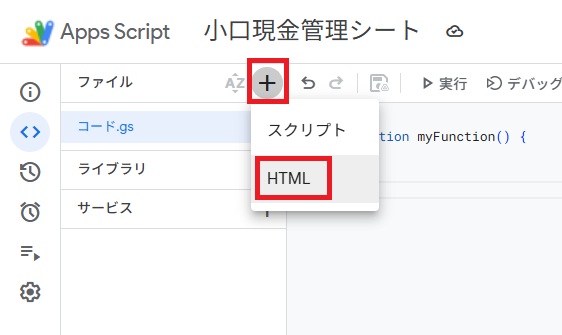
2.ファイル名に「SettingDialog」と入力してEnterキーを押します。
3.新しく作成されたSettingDialog.htmlの中身をすべて削除し、以下のコードをそのまま貼り付けて、保存してください。
「ファイル」の横の方にある「フロッピーディスクのアイコン」か「ctrl+S」で出来ます。
<!DOCTYPE html>
<html>
  <head>
    <base target="_top">
    <style>
      body { font-family: sans-serif; padding: 20px; }
      select, button { width: 100%; padding: 8px; margin-top: 10px; box-sizing: border-box; }
      button.action { background-color: #4285f4; color: white; border: none; cursor: pointer; }
      button.cancel { background-color: #f1f1f1; color: black; border: 1px solid #ccc; cursor: pointer; }
      #status { margin-top: 15px; font-size: 0.9em; text-align: center; }
    </style>
  </head>
  <body>
    <p>通知を受け取りたい時間帯を選択してください。</p>
    <select id="hour-select"></select>
    <button id="save-btn" class="action" onclick="saveSettings()">設定を保存</button>
    <button class="cancel" onclick="google.script.host.close()">キャンセル</button>
    <div id="status"></div>
    <script>
      document.addEventListener("DOMContentLoaded", function() {
        google.script.run.withSuccessHandler(function(currentHour) {
          const select = document.getElementById("hour-select");
          for (let i = 0; i <= 23; i++) {
            const option = document.createElement("option");
            option.value = i; option.text = `毎日 ${i}時台`;
            if (i === currentHour) option.selected = true;
            select.appendChild(option);
          }
        }).getCurrentTriggerHour();
      });
      function saveSettings() {
        const saveBtn = document.getElementById("save-btn");
        const statusDiv = document.getElementById("status");
        saveBtn.disabled = true;
        statusDiv.textContent = "設定を更新中...";
        const selectedHour = document.getElementById("hour-select").value;
        google.script.run
          .withSuccessHandler(function(response) {
            statusDiv.textContent = response;
            setTimeout(function() { google.script.host.close(); }, 1500);
          })
          .withFailureHandler(function(error) {
            statusDiv.textContent = 'エラー: ' + error.message;
            saveBtn.disabled = false;
          })
          .updateTrigger(selectedHour);
      }
    </script>
  </body>
</html>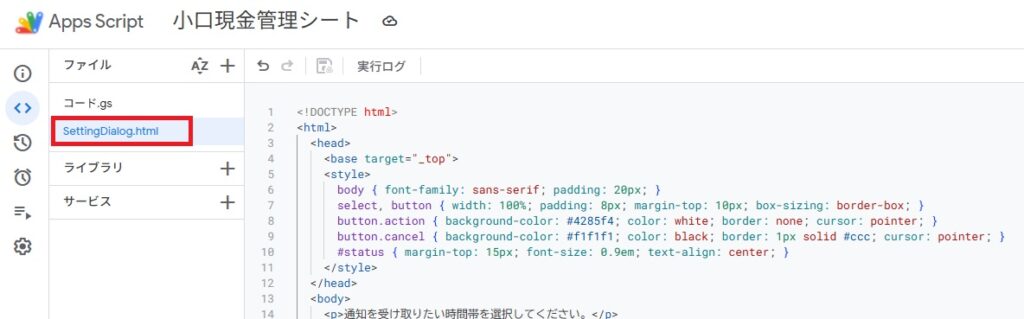
② メール内容設定ダイアログの作成
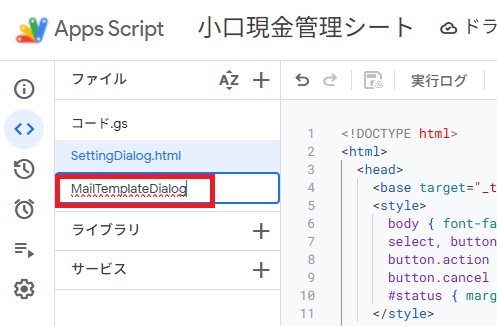
1.上と同じように、「+」から「HTML」を選択し、今度は「MailTemplateDialog」という名前で新しいファイルを作成します。
2.作成されたファイルの中身をすべて削除し、以下のコードを貼り付けて、保存してください。
<!DOCTYPE html>
<html>
  <head>
    <base target="_top">
    <style>
      body { font-family: sans-serif; padding: 10px 20px; }
      .container { display: flex; flex-direction: column; height: 95vh; }
      .content { flex-grow: 1; overflow-y: auto; }
      .footer { flex-shrink: 0; padding-top: 10px; }
      label { font-weight: bold; margin-top: 15px; display: block; }
      input, textarea { width: 100%; padding: 8px; box-sizing: border-box; border: 1px solid #ccc; border-radius: 4px; }
      textarea { height: 100px; resize: vertical; }
      button { padding: 8px 12px; margin-top: 10px; cursor: pointer; border-radius: 4px; border: none; }
      .action { background-color: #4285f4; color: white; }
      .cancel { background-color: #f1f1f1; }
      .keywords { background-color: #f9f9f9; border: 1px solid #ddd; padding: 10px; margin-top: 10px; font-size: 0.9em; border-radius: 4px; }
      #status { margin-top: 10px; text-align: center; }
    </style>
  </head>
  <body>
    <div class="container">
      <div class="content">
        <label for="to">TO:</label>
        <textarea id="to" placeholder="例: tanaka@example.com, suzuki@example.com"></textarea>

        <label for="cc">CC:</label>
        <textarea id="cc" placeholder="(任意)カンマ区切りで複数指定可"></textarea>

        <label for="subject">件名:</label>
        <input type="text" id="subject">

        <label for="body">本文:</label>
        <textarea id="body"></textarea>

        <div class="keywords">
          <b>使えるキーワード:</b><br>
          <code>{{シート名}}</code> <code>{{日付}}</code> <code>{{過不足額}}</code> <code>{{シートURL}}</code>
        </div>
      </div>
      <div class="footer">
        <button id="save-btn" class="action" onclick="saveSettings()">設定を保存</button>
        <button class="cancel" onclick="google.script.host.close()">キャンセル</button>
        <div id="status"></div>
      </div>
    </div>
    <script>
      // ダイアログが開かれたときに実行
      document.addEventListener("DOMContentLoaded", function() {
        google.script.run.withSuccessHandler(function(settings) {
          document.getElementById("to").value = settings.to || '';
          document.getElementById("cc").value = settings.cc || '';
          document.getElementById("subject").value = settings.subject || '';
          document.getElementById("body").value = settings.body || '';
        }).getAllSettings();
      });

      // 「保存」ボタンが押されたときの処理
      function saveSettings() {
        const saveBtn = document.getElementById("save-btn");
        const statusDiv = document.getElementById("status");
        saveBtn.disabled = true;
        statusDiv.textContent = "設定を保存中...";

        const settings = {
          to: document.getElementById("to").value,
          cc: document.getElementById("cc").value,
          subject: document.getElementById("subject").value,
          body: document.getElementById("body").value
        };

        google.script.run
          .withSuccessHandler(function(response) {
            statusDiv.textContent = response;
            setTimeout(function() { google.script.host.close(); }, 1500);
          })
          .withFailureHandler(function(error) {
            statusDiv.textContent = 'エラー: ' + error.message;
            saveBtn.disabled = false;
          })
          .saveAllSettings(settings);
      }
    </script>
  </body>
</html>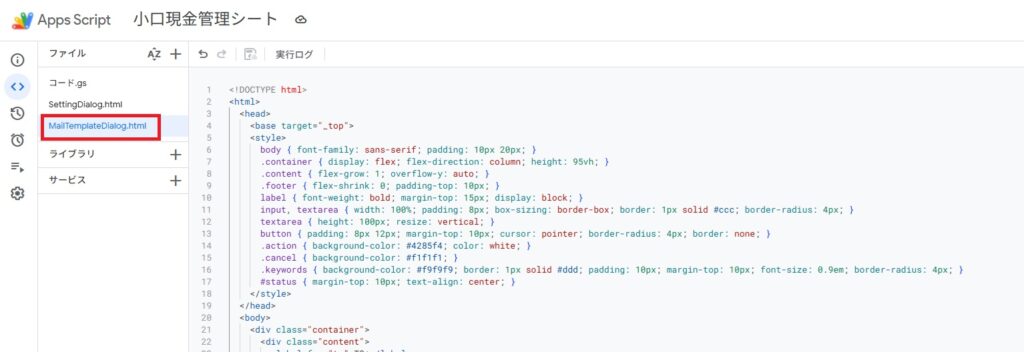
STEP3:GASで自動メール送信の仕組みを作る
いよいよ、GASスクリプト本体を記述します。
1.スクリプトエディタで コード.gs ファイルを開きます。
2.中に書かれているコードをすべて消し、以下のコードはコピペしてください。
//==============【設定項目】ここから==============
const SHEET_NAME = '金種表';
const DATE_COLUMN = 1;
const DISCREPANCY_COLUMN = 13;
//==============【設定項目】ここまで==============

const scriptProperties = PropertiesService.getScriptProperties();

// メニュー作成
function onOpen() {
  SpreadsheetApp.getUi()
    .createMenu('⚙️ 自動通知設定')
    .addItem('メール内容の設定...', 'showMailTemplateDialog')
    .addItem('通知時刻の設定...', 'showSettingDialog')
    .addSeparator()
    .addItem('今すぐ差異をチェック', 'manualCheck')
    .addToUi();
}
function showMailTemplateDialog() {
  const html = HtmlService.createHtmlOutputFromFile('MailTemplateDialog').setWidth(500).setHeight(550);
  SpreadsheetApp.getUi().showModalDialog(html, 'メール内容の設定');
}
function showSettingDialog() {
  const html = HtmlService.createHtmlOutputFromFile('SettingDialog').setWidth(350).setHeight(230);
  SpreadsheetApp.getUi().showModalDialog(html, '通知時刻の設定');
}
function saveAllSettings(settings) {
  scriptProperties.setProperties(settings, true);
  return '設定を保存しました。';
}
function getAllSettings() {
  const defaultSettings = { to: '', cc: '', subject: '【要確認】小口現金に差異が発生しました', body: '「{{シート名}}」の金種表で現金過不足が検出されました。\n\n■ 日付: {{日付}}\n■ 過不足額: {{過不足額}} 円\n\n内容を確認してください。\n\n▼スプレッドシートを開く\n{{シートURL}}'};
  const currentSettings = scriptProperties.getProperties();
  return Object.keys(currentSettings).length > 0 ? currentSettings : defaultSettings;
}
function updateTrigger(hour) {
  const triggerHour = parseInt(hour, 10);
  const allTriggers = ScriptApp.getProjectTriggers();
  for (const trigger of allTriggers) { if (trigger.getHandlerFunction() === 'dailyCheckAndNotify') ScriptApp.deleteTrigger(trigger); }
  if (triggerHour >= 0 && triggerHour <= 23) {
    ScriptApp.newTrigger('dailyCheckAndNotify').timeBased().everyDays(1).atHour(triggerHour).create();
    return `通知時刻を毎日 ${triggerHour}時台に設定しました。`;
  } else { throw new Error('無効な時刻が選択されました。'); }
}
function getCurrentTriggerHour() {
  const triggers = ScriptApp.getProjectTriggers();
  for (const trigger of triggers) { if (trigger.getHandlerFunction() === 'dailyCheckAndNotify') return 16; }
  return 16;
}
function manualCheck() {
  dailyCheckAndNotify();
  SpreadsheetApp.getUi().alert('チェックが完了しました。');
}


/**
 * ★★★ 毎日定時に実行されるメイン処理 ★★★
 */
function dailyCheckAndNotify() {
  const sheet = SpreadsheetApp.getActiveSpreadsheet().getSheetByName(SHEET_NAME);
  if (!sheet) { return; }

  // ★★★ A列の値を基準に、本当にデータがある最終行を見つける ★★★
  const lastRow = getLastDataRow(sheet);

  if (lastRow <= 1) { return; }

  const discrepancyValue = sheet.getRange(lastRow, DISCREPANCY_COLUMN).getValue();

  if (discrepancyValue !== 0 && discrepancyValue !== '') {
    const date = new Date(sheet.getRange(lastRow, DATE_COLUMN).getValue());
    const discrepancyInfo = {
      date: Utilities.formatDate(date, 'JST', 'yyyy/MM/dd'),
      amount: discrepancyValue
    };
    sendDiscrepancyMail(discrepancyInfo);
  }
}

/**
 * ★★★ 書式設定に惑わされず、データのある最終行を取得する関数 ★★★
 */
function getLastDataRow(sheet) {
  const columnValues = sheet.getRange("A:A").getValues(); // A列のすべての値を取得
  for (let i = columnValues.length - 1; i >= 0; i--) {
    if (columnValues[i][0] !== "") { // A列が空でない最後の行を探す
      return i + 1; // 配列のインデックスは0から始まるので+1する
    }
  }
  return 0; // データが全くない場合
}

/**
 * ★★★ メールを送信する関数 ★★★
 */
function sendDiscrepancyMail(discrepancyInfo) {
  const settings = scriptProperties.getProperties();
  if (!settings.to) {
    console.error('送信エラー: TOの宛先が設定されていません。');
    return;
  }

  const spreadsheet = SpreadsheetApp.getActiveSpreadsheet();
  const spreadsheetName = spreadsheet.getName();
  const spreadsheetUrl = spreadsheet.getUrl();

  // テンプレートのキーワードを実際の情報に置き換える
  const subject = (settings.subject || '')
    .replace(/{{シート名}}/g, spreadsheetName)
    .replace(/{{日付}}/g, discrepancyInfo.date)
    .replace(/{{過不足額}}/g, discrepancyInfo.amount.toLocaleString())
    .replace(/{{シートURL}}/g, spreadsheetUrl);

  const body = (settings.body || '')
    .replace(/{{シート名}}/g, spreadsheetName)
    .replace(/{{日付}}/g, discrepancyInfo.date)
    .replace(/{{過不足額}}/g, discrepancyInfo.amount.toLocaleString())
    .replace(/{{シートURL}}/g, spreadsheetUrl);

  const mailOptions = { cc: settings.cc || '' };
  MailApp.sendEmail(settings.to, subject, body, mailOptions);
}
この画像の状態だと保存出来ていません。
STEP4:使い方と初回設定
これで準備は完了です。
それでは、初回設定と使い方を説明します。
1.スプレッドシートのブラウザタブを再読み込み(リロード)してください。
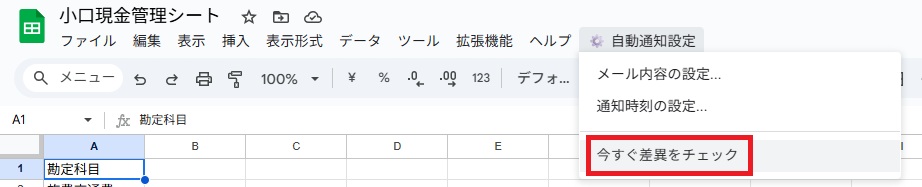
2.上部メニューに「⚙️ 自動通知設定」という新しい項目が表示されます。
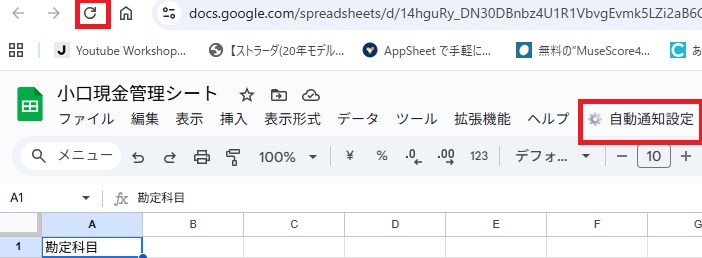
表示されるまでに少し間があるので、待っていてください。
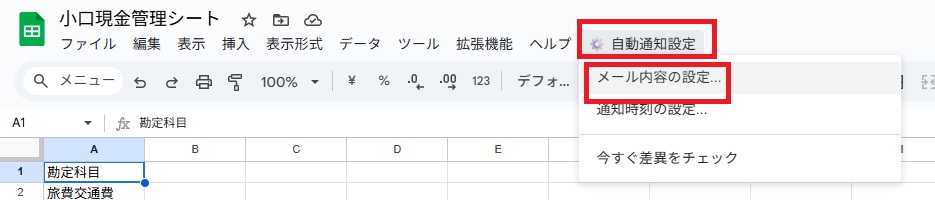
3.まずは「⚙️ 自動通知設定」→「メール内容の設定…」を選びます。
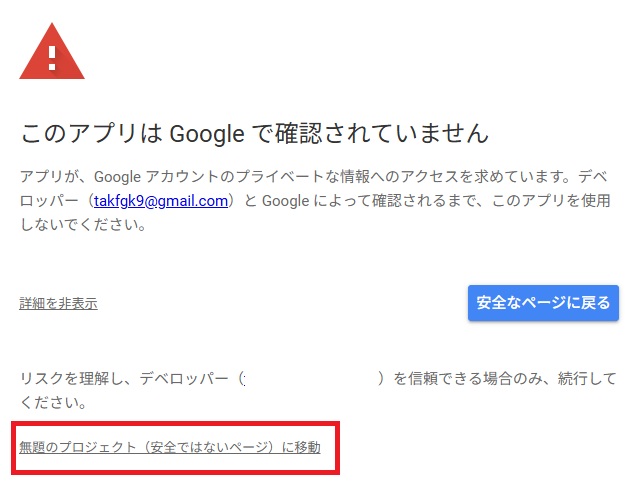
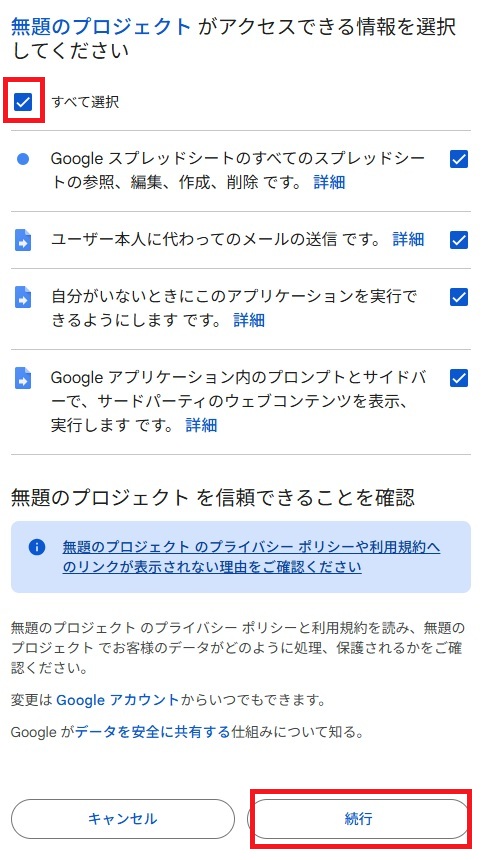
4.(初回のみ)Googleによる承認が求められます。
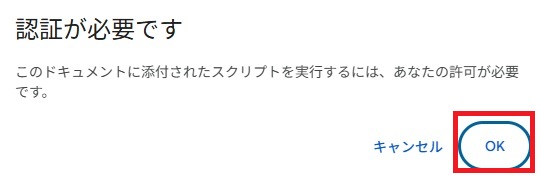
5.(初回のみ)画面の指示に従い、ご自身のアカウントを選択して「許可」をクリックしてください。
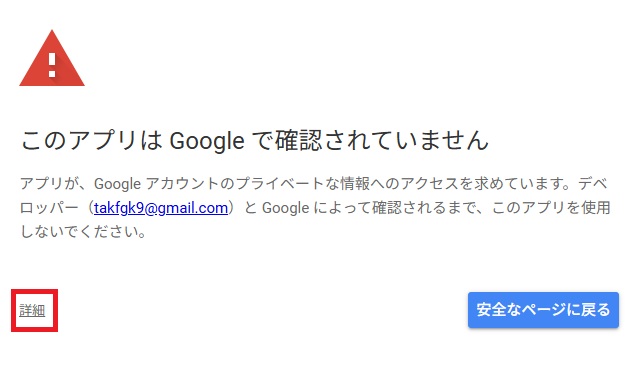
6.(初回のみ)「このアプリはGoogleで確認されていません」と表示されたら、「詳細」→「(プロジェクト名)に移動」をクリックして進めます
7.「メール内容の設定」ダイアログに宛先や件名、本文を自由に入力して保存します。
8.次に「通知時刻の設定…」を選び、通知してほしい時間帯を選んで保存します。
これで、毎日あなたが設定した時間に、スクリプトが自動で残高をチェックし、差異があればメールでお知らせしてくれます。
すぐに動作を試したい場合は、「⚙️ 自動通知設定」>「今すぐ差異をチェック」をクリックすれば、時間に関係なく手動でチェックを実行できます。
おわりに
お疲れ様でした!
これで、日々の面倒な残高チェックから解放され、万が一の差異にもすぐに気づける、あなただけの強力なアシスタントが完成しました。
Google Apps Scriptは、このように日々の業務の「ちょっと面倒」を解決する大きな可能性を秘めています。
ぜひ今回の仕組みをきっかけに、色々な自動化にチャレンジしてみてください!